eventBus简介

背景

参考文章

概述

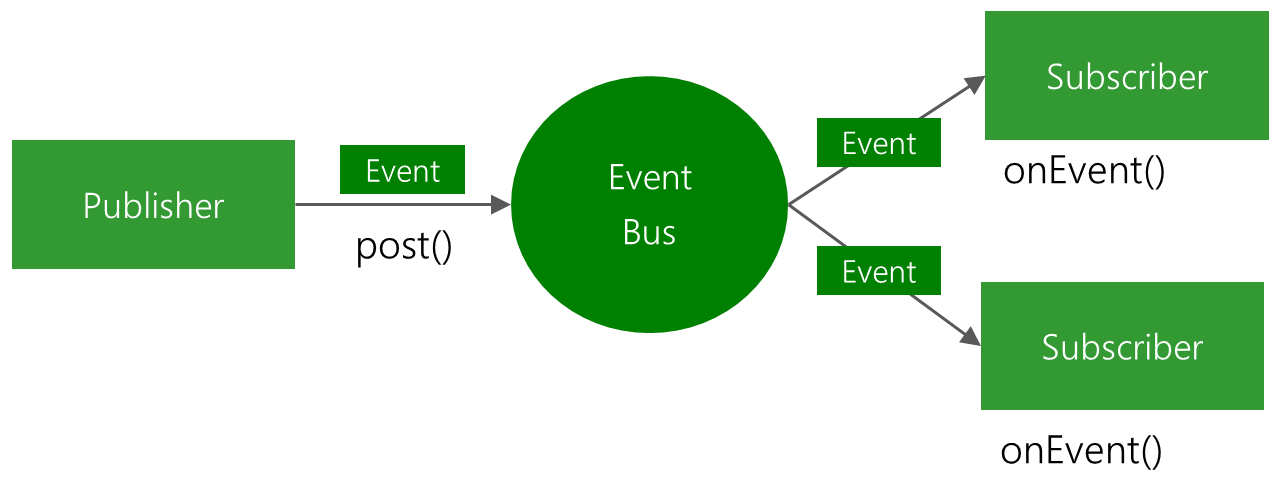
  • EventBus是一个发布/订阅的事件总线简化了应用程序各个组件间(Activity、service、Fragment等)组件和后台线程间的通信。EventBus主要角色如下:
    1. Event 传递的事件对象。
    2. Subscriber 事件的订阅者。
    3. Publisher 事件的发布者。
    4. ThreadMode 定义函数在何种线程中执行。
  • 订阅者订阅事件到总线,发送者发布事件,官方给出的它们的关系图如下:
    EventBus-Publish-Subscribe.png

使用EventBus

build.gradle添加引用

  • github里面可以找到最新的版本,现在是3.0
1
compile 'org.greenrobot:eventbus:3.0.0'

定义一个事件类型

  • 这个事件类型实体类,可以自己定义:
1
2
3
4
5
6
7
8
public class EventBusMsg {
// 类的结构是自定义的,我这类添加了一个 String类型的 name 字段 方便测试.
public String name;
public EventBusMsg(String name) {
this.name = name;
}
}

订阅/取消订阅事件

  • 订阅事件进行三步设置,注册、取消注册和定义事件接受函数,
1
2
3
4
5
6
@Override
protected void onCreate(Bundle savedInstanceState) {
...
// 1. 注册
EventBus.getDefault().register(MainActivity.this);
}
  • 在界面销毁时取消订阅
1
2
3
4
5
6
@Override
protected void onDestroy() {
super.onDestroy();
// 2. 解注册
EventBus.getDefault().unregister(MainActivity.this);
}
  • 定义事件接收方法,方法的名字自己定义,使用注解@Subscribe()表示
1
2
3
4
5
@Subscribe(threadMode = ThreadMode.MAIN)
public void onMessageEvent(EventBusMsg event) {
Log.d(TAG, "接收到信息");
tv_console.setText("EventBus 数据 : " + event.name);
}
  • 使用@Subscribe()注解表明这个方法是EventBus事件接收的方法。
  • 事件接收方法的参数必须和EventBus发送的事件类是同一类型,比如例子中是EventBusMsg。
  • 在@Subscribe()中可以设置threadMode来设置不同的模式,ThreadMode.Main表示运行在主线程。

发布事件

  • 比较简单,调用EventBus的post方法即可
1
2
3
4
5
6
public void sendMsg(View view) {
// 发送消息
EventBus.getDefault().post(new EventBusMsg("我是EventBus发送的数据"));
// 销毁当前Activity
finish();
}
  • 上面的流程是要先订阅事件,再发布事件才能接收到事件。

EventBus 事件回调方法线程(Delivery Thread)

  • EventBus会处理事件接收线程的问题,比如:在线程A中发布事件,事件传递到线程B中执行,这个功能主要用在处理更新UI的问题上。EventBus可以帮助我们处理UI和后台任务的同步问题,EventBus有四种线程模式,可以通过@Subscribe()朱姐的threadMode参数指定:

ThreadMode.POSTING

  • POSTING是默认参数,即接收事件的方法和发布消息的方法运行在同一个线程中。这种模式优点是:开销最小,不需要切换线程。
1
2
3
4
5
6
// 运行在发布消息的线程中 (default)
// ThreadMode 是可选设置
@Subscribe(threadMode = ThreadMode.POSTING)
public void onMessage(MessageEvent event) {
log(event.message);
}

ThreadMode:MAIN

  • 事件接收方会运行在UI线程,不过这里注意:如果发布事件的线程是主线程,那么事件就会直接发布给订阅者,不会进行线程切换,也相当于使用了POSTING模式。另外,在这个模式下不要在事件接收方法中进行耗时操作,防止UI线程阻塞:
1
2
3
4
5
// 运行在 UI 线程中(主线程)
@Subscribe(threadMode = ThreadMode.MAIN)
public void onMessage(MessageEvent event) {
textField.setText(event.message);
}

ThreadMode:BACKGROUND

  • 事件接收方法将会运行在一个后台线程中,但是事件不可以并发执行:

    1. 如果发布事件本身就在后台线程中,那么事件接收方就运行在这个线程中,不再另外开启新的线程。
    2. 如果发布事件在主线程中,那么EventBus会开一个后台线程(只有一个)然后在该线程中依次处理所有事件。
  • 不过要注意:事件处理方法应当尽快返回,避免阻塞后台线程。

1
2
3
4
5
// 运行在后台线程中.
@Subscribe(threadMode = ThreadMode.BACKGROUND)
public void onMessage(MessageEvent event){
saveToDisk(event.message);
}

ThreadMode:ASYNC

  • 在ASYNC模式下事件接收方总是运行在一个发布事件线程和主线程之外独立的线程中,发布事件不必依赖订阅事件处理结果,因此此模式适合于在事件处理中有比较耗时的操作的情况,为了避免同一时间有过多的运行线程,EventBus使用线程池和事件处理完成通知来限制最大的线程并发数
1
2
3
4
5
// 运行在一个独立的线程中.
@Subscribe(threadMode = ThreadMode.ASYNC)
public void onMessage(MessageEvent event){
backend.send(event.message);
}

EventBus 高级一点的用法:粘性事件(Stick Events)

  • 在上面提到的基本使用中我们提到的模式都是必须先订阅事件然后再发布事件,不过EventBus还有另一种用法:粘性事件,这种模式允许先发布事件再订阅事件,EventBus会将粘性事件保存到内存中然后发送给订阅者,订阅者也可以主动查询粘性事件。

定义事件实体类

  • 和上面定义事件是一样的:
1
2
3
4
5
6
public class EventBusStickyMsg {
public String name;
public EventBusStickyMsg(String name) {
this.name = name;
}
}

发布粘性事件

  • 发布粘性事件使用postSticky()方法:
1
2
3
4
5
6
public void sendStickyEvent(View view) {
EventBus.getDefault().postSticky(new EventBusStickyMsg("我是Sticky消息"));
// 启动 EventBusSendActivity
Intent intent = new Intent(MainActivity.this, EventBusSendActivity.class);
MainActivity.this.startActivity(intent);
}

订阅粘性事件

  • 订阅粘性事件和订阅普通事件是一样的,都使用EventBus的注册,取消注册及事件接收函数:

注册

  • 注意不能重复注册,可能造成程序崩溃
    1
    2
    3
    4
    public void getStickyMsg(View view) {
    // 注册,注意不要进行多次注册,否则程序可能崩溃.可以设置一个标志.
    EventBus.getDefault().register(EventBusSendActivity.this);
    }

取消注册

1
2
3
4
5
6
7
8
@Override
protected void onDestroy() {
super.onDestroy();
// 移除所有的粘性事件.
EventBus.getDefault().removeAllStickyEvents();
// 解注册
EventBus.getDefault().unregister(EventBusSendActivity.this);
}

定义事件接收方法

  • 粘性事件接收方法需要在@Subscribe()注解中添加sticky=true参数。
1
2
3
4
@Subscribe(sticky = true , threadMode = ThreadMode.MAIN)
public void onStickyEvent(EventBusStickyMsg event) {
tv_console.setText("Sticky 数据 : " + event.name);
}

手动获取粘性事件

1
2
3
4
5
6
7
public void getStickyMsgRemove(View view) {
// 手动获取粘性事件
EventBusStickyMsg msg = EventBus.getDefault().removeStickyEvent(EventBusStickyMsg.class);
if (msg != null) {
tv_console.setText(tv_console.getText().toString() + msg.name);
}
}
  • removeStickyEvent 返回的是被删除的事件。我们获取了该粘性事件后,EventBus并不会主动删除粘性事件。(上面的订阅方式也不会删除)。

使用EventBusAnnotationProcessor

  • 在EventBus 3中引入了EventBusAnnotationProcessor(注解分析生成索引)技术,大大提高了EventBus的运行效率。

gradle配置

  • 除了上面导入org.greenrobot:eventbus:3.0.0之外,还需要额外导入一些内容,在项目gradle的dependencies中引入apt编译插件:
1
classpath 'com.neenbedankt.gradle.plugins:android-apt:1.8'
  • 在App的build.gradle中应用apt插件,并设置apt生成的索引的包名和类名:
1
2
3
4
5
6
7
8
9
10
11
12
apply plugin: 'com.neenbedankt.android-apt'
apt {
arguments {
eventBusIndex "com.study.sangerzhong.studyapp.MyEventBusIndex"
}
}
dependencies{
...
apt 'org.greenrobot:eventbus-annotation-processor:3.0.1'
...
}

初始化EventBus

1
EventBus mEventBus = EventBus.builder().addIndex(new MyEventBusIndex()).build();

其他

  • 其他方面和不使用索引加速都是一样的。

源码分析

EventBus.getDefault()

1
2
3
4
5
6
7
8
9
10
11
12
13
14
15
16
17
18
19
20
21
22
23
24
25
26
27
28
29
30
31
32
33
34
35
36
37
38
39
40
41
42
43
44
45
46
47
48
49
50
51
52
53
54
55
56
57
private static final EventBusBuilder DEFAULT_BUILDER = new EventBusBuilder();
private final Map<Class<?>, CopyOnWriteArrayList<Subscription>> subscriptionsByEventType;
private final Map<Object, List<Class<?>>> typesBySubscriber;
private final Map<Class<?>, Object> stickyEvents;
public static EventBus getDefault() {
if (defaultInstance == null) {
synchronized (EventBus.class) {
if (defaultInstance == null) {
defaultInstance = new EventBus();
}
}
}
return defaultInstance;
}
/**
* Creates a new EventBus instance; each instance is a separate scope in which events are delivered. To use a
* central bus, consider {@link #getDefault()}.
*/
public EventBus() {
this(DEFAULT_BUILDER);
}
EventBus(EventBusBuilder builder) {
// key 为事件的类型,value 为所有订阅该事件类型的订阅者集合
subscriptionsByEventType = new HashMap<>();
// key 为某个订阅者,value 为该订阅者所有的事件类型
typesBySubscriber = new HashMap<>();
// 粘性事件的集合,key 为事件的类型,value 为该事件的对象
stickyEvents = new ConcurrentHashMap<>();
// 主线程事件发送者
mainThreadPoster = new HandlerPoster(this, Looper.getMainLooper(), 10);
// 子线程事件发送者
backgroundPoster = new BackgroundPoster(this);
// 异步线程事件发送者
asyncPoster = new AsyncPoster(this);
// 索引类的数量
indexCount = builder.subscriberInfoIndexes != null ? builder.subscriberInfoIndexes.size() : 0;
// 订阅方法查找者
subscriberMethodFinder = new SubscriberMethodFinder(builder.subscriberInfoIndexes,
builder.strictMethodVerification, builder.ignoreGeneratedIndex);
// 是否打印订阅者异常的日志,默认为 true
logSubscriberExceptions = builder.logSubscriberExceptions;
// 是否打印没有订阅者的异常日志,默认为 true
logNoSubscriberMessages = builder.logNoSubscriberMessages;
// 是否允许发送 SubscriberExceptionEvent ,默认为 true
sendSubscriberExceptionEvent = builder.sendSubscriberExceptionEvent;
// 是否允许发送 sendNoSubscriberEvent ,默认为 true
sendNoSubscriberEvent = builder.sendNoSubscriberEvent;
// 是否允许抛出订阅者的异常,默认是 false
throwSubscriberException = builder.throwSubscriberException;
// 是否支持事件继承,默认是 true
eventInheritance = builder.eventInheritance;
// 创建线程池
executorService = builder.executorService;
}
  • 上面的源码看出,EventBus.getDefault()代码,其实是获取了EventBus类的单例,若该单例未实例化,那么会根据DEFAULE_BUILDER采用构造者模式去实例化该单例,在EventBus构造器中初始化了一堆成员变量,接下来的操作中会用到。

register(Object subscriber)

  • 事件订阅者要调用register(Object subscriber)方法来进行注册:
1
2
3
4
5
6
7
8
9
10
11
public void register(Object subscriber) {
// 得到订阅者的类 class
Class<?> subscriberClass = subscriber.getClass();
// 找到该 class 下所有的订阅方法
List<SubscriberMethod> subscriberMethods = subscriberMethodFinder.findSubscriberMethods(subscriberClass);
synchronized (this) {
for (SubscriberMethod subscriberMethod : subscriberMethods) {
subscribe(subscriber, subscriberMethod);
}
}
}
  • 而 SubscriberMethod 其实就是订阅方法的包装类:
1
2
3
4
5
6
7
8
9
10
11
12
13
14
15
16
17
18
19
20
21
22
23
24
25
26
27
28
29
30
31
32
33
34
35
36
37
38
39
40
41
42
43
public class SubscriberMethod {
// 订阅的方法
final Method method;
// 订阅所在的线程
final ThreadMode threadMode;
// 订阅事件的类型
final Class<?> eventType;
// 优先级
final int priority;
// 订阅是否是粘性的
final boolean sticky;
// 特定字符串,用来比较两个 SubscriberMethod 是否为同一个
String methodString;
...
}
- 那么订阅其实就由两个主要的步骤:subscriberMethodFinder.findSubscriberMethods 和 subscribe(),从名字上我们可以猜个大概,subscriberMethodFinder是用来查找有@Subscribe注解方法的,然后Subscribe()是用来完成订阅的。接下来我们就分别来看下他们的源码:
- 先看subscriberMethodFinder.findSubscriberMethods做了什么:
``` java
List<SubscriberMethod> findSubscriberMethods(Class<?> subscriberClass) {
List<SubscriberMethod> subscriberMethods = METHOD_CACHE.get(subscriberClass);
if (subscriberMethods != null) {
return subscriberMethods;
}
if (ignoreGeneratedIndex) {
subscriberMethods = findUsingReflection(subscriberClass);
} else {
subscriberMethods = findUsingInfo(subscriberClass);
}
if (subscriberMethods.isEmpty()) {
throw new EventBusException("Subscriber " + subscriberClass
+ " and its super classes have no public methods with the @Subscribe annotation");
} else {
// 将找到的订阅方法放到cache中,并返回
METHOD_CACHE.put(subscriberClass, subscriberMethods);
return subscriberMethods;
}
}
  • 为了性能,首先会去缓存中查找是否存在类对应的SubscriberMethod list,如果存在就直接返回了。
  • 接下来会判断ignoreGeneratedIndex,这个就是上面提到的索引加速,如果使用索引加速,ignoreGeneratedIndex就是false。否则是true。不过默认是false,也就是默认会去查找索引生成的文件。接下来我们直接看findUserInfo的代码:
1
2
3
4
5
6
7
8
9
10
11
12
13
14
15
16
17
18
19
20
21
22
23
24
25
private List<SubscriberMethod> findUsingInfo(Class<?> subscriberClass) {
// findState 是一个内部类。用于保存和校验到的订阅信息
FindState findState = prepareFindState();
findState.initForSubscriber(subscriberClass);
while (findState.clazz != null) {
// 这里是从索引中直接查找订阅信息,如果不使用索引加速的话,这里是null
findState.subscriberInfo = getSubscriberInfo(findState);
if (findState.subscriberInfo != null) {
SubscriberMethod[] array = findState.subscriberInfo.getSubscriberMethods();
for (SubscriberMethod subscriberMethod : array) {
if (findState.checkAdd(subscriberMethod.method, subscriberMethod.eventType)) {
findState.subscriberMethods.add(subscriberMethod);
}
}
} else {
// 不使用索引加速,那么会执行到这里,通过反射来查找信息
findUsingReflectionInSingleClass(findState);
}
// 这里是去查找父类是否有订阅方法,不过已经过滤掉系统方法。
findState.moveToSuperclass();
}
// 从findState中取出订阅方法列表,然后释放findState
return getMethodsAndRelease(findState);
}
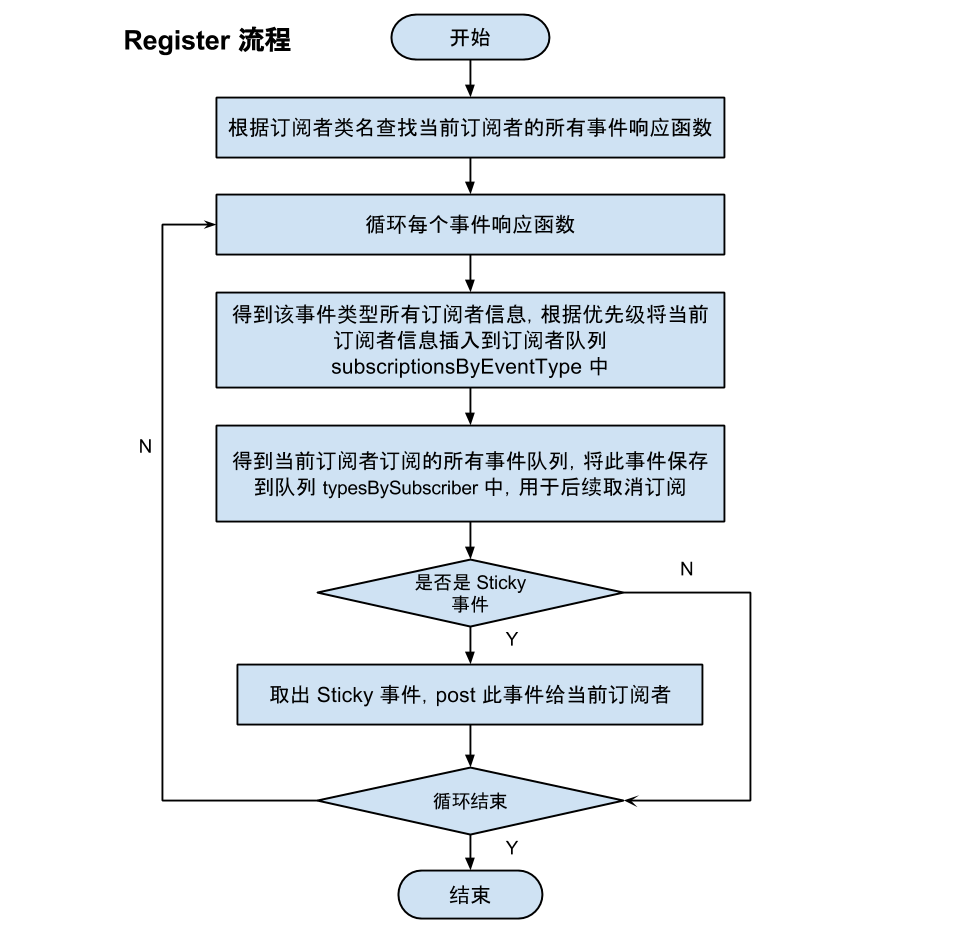
  • 接下来再看subscribe(subscriber, subscriberMethod) 方法:
1
2
3
4
5
6
7
8
9
10
11
12
13
14
15
16
17
18
19
20
21
22
23
24
25
26
27
28
29
30
31
32
33
34
35
36
37
38
39
40
41
42
43
44
45
46
47
48
49
50
51
52
53
54
55
56
57
58
59
60
private void subscribe(Object subscriber, SubscriberMethod subscriberMethod) {
// 得到订阅方法的事件类型
Class<?> eventType = subscriberMethod.eventType;
Subscription newSubscription = new Subscription(subscriber, subscriberMethod);
// 根据订阅方法的事件类型得到所有订阅该事件类型的订阅者集合
CopyOnWriteArrayList<Subscription> subscriptions = subscriptionsByEventType.get(eventType);
if (subscriptions == null) {
subscriptions = new CopyOnWriteArrayList<>();
subscriptionsByEventType.put(eventType, subscriptions);
} else {
// 如果 subscriptions 已经包含了,抛出异常
if (subscriptions.contains(newSubscription)) {
throw new EventBusException("Subscriber " + subscriber.getClass() + " already registered to event "
+ eventType);
}
}
// 根据该 subscriberMethod 优先级插入到 subscriptions 中
int size = subscriptions.size();
for (int i = 0; i <= size; i++) {
if (i == size || subscriberMethod.priority > subscriptions.get(i).subscriberMethod.priority) {
subscriptions.add(i, newSubscription);
break;
}
}
// 放入 subscribedEvents 中,key:订阅者 value:该订阅者的所有订阅事件的类型
List<Class<?>> subscribedEvents = typesBySubscriber.get(subscriber);
if (subscribedEvents == null) {
subscribedEvents = new ArrayList<>();
typesBySubscriber.put(subscriber, subscribedEvents);
}
subscribedEvents.add(eventType);
// 如果订阅的方法支持 sticky
if (subscriberMethod.sticky) {
// 如果支持事件继承
if (eventInheritance) {
// Existing sticky events of all subclasses of eventType have to be considered.
// Note: Iterating over all events may be inefficient with lots of sticky events,
// thus data structure should be changed to allow a more efficient lookup
// (e.g. an additional map storing sub classes of super classes: Class -> List<Class>).
Set<Map.Entry<Class<?>, Object>> entries = stickyEvents.entrySet();
// 遍历 stickyEvents
for (Map.Entry<Class<?>, Object> entry : entries) {
Class<?> candidateEventType = entry.getKey();
// 判断 eventType 类型是否是 candidateEventType 的父类
if (eventType.isAssignableFrom(candidateEventType)) {
// 得到对应 eventType 的子类事件,类型为 candidateEventType
Object stickyEvent = entry.getValue();
// 发送粘性事件给 newSubscription
checkPostStickyEventToSubscription(newSubscription, stickyEvent);
}
}
} else {
// 拿到之前 sticky 的事件,然后发送给 newSubscription
Object stickyEvent = stickyEvents.get(eventType);
// 发送粘性事件给 newSubscription
checkPostStickyEventToSubscription(newSubscription, stickyEvent);
}
}
}
  • register的流程图如下:
    eventbus3_register.png

post(object event)

  • 接下来看post方法的执行逻辑:
1
2
3
4
5
6
7
8
9
10
11
12
13
14
15
16
17
18
19
20
21
22
23
24
25
public void post(Object event) {
//得到当前线程的Posting状态.
PostingThreadState postingState = currentPostingThreadState.get();
//获取当前线程的事件队列
List<Object> eventQueue = postingState.eventQueue;
eventQueue.add(event);
if (!postingState.isPosting) {
postingState.isMainThread = Looper.getMainLooper() == Looper.myLooper();
postingState.isPosting = true;
if (postingState.canceled) {
throw new EventBusException("Internal error. Abort state was not reset");
}
try {
//一直发送
while (!eventQueue.isEmpty()) {
//发送单个事件
postSingleEvent(eventQueue.remove(0), postingState);
}
} finally {
postingState.isPosting = false;
postingState.isMainThread = false;
}
}
}
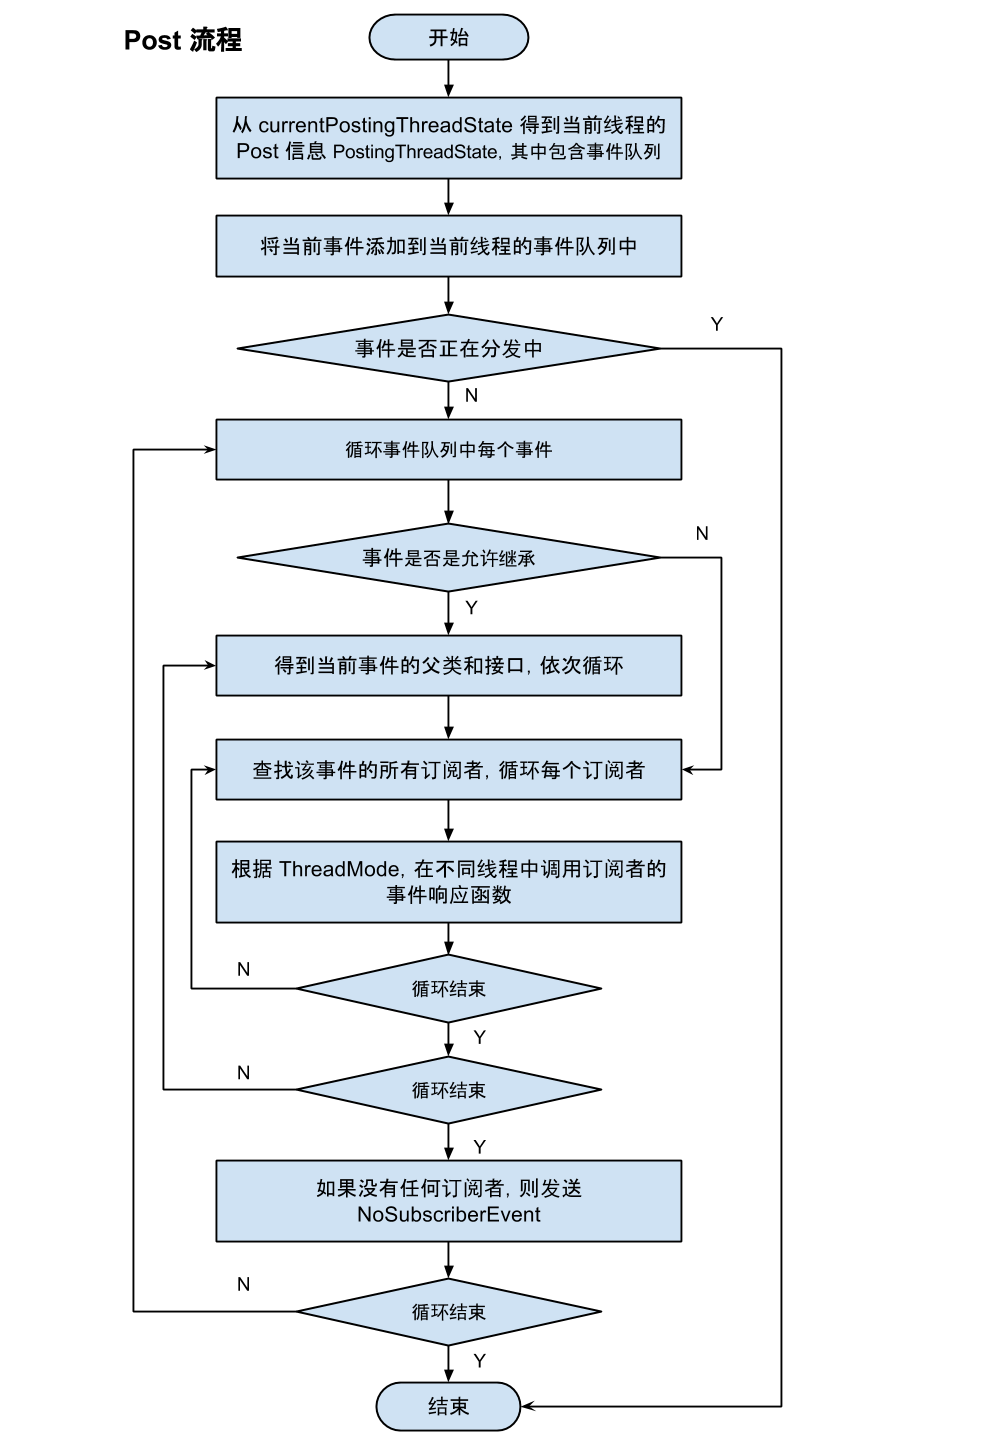
  • currentPostingThreadState.get()获得是当前线程的PostingThreadState对象。其实currentPostingThreadState是一个ThreadLocal,ThreadLocal是一个线程内部的数据存储类,通过它可以在指定的线程中存储数据,而这数据时不会与其他线程共享的。其实现原理是:在每个thread中会有一个threadLocals,它其实是一个ThreadLocal.ThreadLocalMap,Map中的key是ThreadLocal,value就是我们存储的变量副本。
  • 接下来看看postSingleEvent都做了什么:
1
2
3
4
5
6
7
8
9
10
11
12
13
14
15
16
17
18
19
20
21
22
23
24
25
26
27
28
29
30
private void postSingleEvent(Object event, PostingThreadState postingState) throws Error {
Class<?> eventClass = event.getClass();
boolean subscriptionFound = false;
//是否触发订阅了该事件(eventClass)的父类,以及接口的类的响应方法.默认是true
if (eventInheritance) {
//查找eventClass类所有的父类以及接口
List<Class<?>> eventTypes = lookupAllEventTypes(eventClass);
int countTypes = eventTypes.size();
//循环postSingleEventForEventType
for (int h = 0; h < countTypes; h++) {
Class<?> clazz = eventTypes.get(h);
//只要右边有一个为true,subscriptionFound就为true
subscriptionFound |= postSingleEventForEventType(event, postingState, clazz);
}
} else {
//post单个
subscriptionFound = postSingleEventForEventType(event, postingState, eventClass);
}
//如果没发现,所以如果没有找到对应的subscription,日志中会打印这个。
if (!subscriptionFound) {
if (logNoSubscriberMessages) {
Log.d(TAG, "No subscribers registered for event " + eventClass);
}
if (sendNoSubscriberEvent && eventClass != NoSubscriberEvent.class &&
eventClass != SubscriberExceptionEvent.class) {
//发送一个NoSubscriberEvent事件,如果我们需要处理这种状态,接收这个事件就可以了
post(new NoSubscriberEvent(this, event));
}
}
}
  • 接下来看postSingleEventForEventType的代码
1
2
3
4
5
6
7
8
9
10
11
12
13
14
15
16
17
18
19
20
21
22
23
24
25
26
27
28
29
30
private boolean postSingleEventForEventType(Object event, PostingThreadState postingState, Class<?> eventClass) {
CopyOnWriteArrayList<Subscription> subscriptions;
synchronized (this) {
// 首先从register时采集到的subscribe 列表中获取对应的subscribe
subscriptions = subscriptionsByEventType.get(eventClass);
}
// 如果没有找到则返回false
if (subscriptions != null && !subscriptions.isEmpty()) {
for (Subscription subscription : subscriptions) {
postingState.event = event;
postingState.subscription = subscription;
boolean aborted = false;
try {
// 这个方法里,其实是根据线程的Mode,切换到不同的线程,然后通过Method.involk来执行对应的方法,第三个参数表明当前post的线程是不是主线程。
postToSubscription(subscription, event, postingState.isMainThread);
aborted = postingState.canceled;
} finally {
postingState.event = null;
postingState.subscription = null;
postingState.canceled = false;
}
if (aborted) {
break;
}
}
return true;
}
return false;
}
  • post过程的流程图如下:
    eventbus3_post.png

unregister

1
2
3
4
5
6
7
8
9
10
11
12
13
14
/** Unregisters the given subscriber from all event classes. */
public synchronized void unregister(Object subscriber) {
// 首先从register时收集的typesBySubscriber中取出subscribedTypes,也就是自定义的消息
List<Class<?>> subscribedTypes = typesBySubscriber.get(subscriber);
if (subscribedTypes != null) {
for (Class<?> eventType : subscribedTypes) {
unsubscribeByEventType(subscriber, eventType);
}
//将对应subscriber从列表中移除
typesBySubscriber.remove(subscriber);
} else {
Log.w(TAG, "Subscriber to unregister was not registered before: " + subscriber.getClass());
}
}
  • 接下来再看unsubscribeByEventType方法
1
2
3
4
5
6
7
8
9
10
11
12
13
14
15
16
/** Only updates subscriptionsByEventType, not typesBySubscriber! Caller must update typesBySubscriber. */
private void unsubscribeByEventType(Object subscriber, Class<?> eventType) {
List<Subscription> subscriptions = subscriptionsByEventType.get(eventType);
if (subscriptions != null) {
int size = subscriptions.size();
for (int i = 0; i < size; i++) {
Subscription subscription = subscriptions.get(i);
if (subscription.subscriber == subscriber) {
subscription.active = false;
subscriptions.remove(i);
i--;
size--;
}
}
}
}
  • 这个方法很简单,就是从subscriptionsByEventType列表中将对应eventType的Subscription移除。

总结

  • EventBus是非常好用的一款消息订阅/发布开源库,可以帮助我们省去很多像Handler+thread这类的代码,同时在EventBus3.0中,使用注解的方式取代之前的onEvent开头的方法来写事件接收方法,使代码更加的清晰。
  • 另外从设计上来说,可以将事件发送者和接收者解耦。